

In part one of this series of blog posts I showed you how I created a simple distraction free template to use when editing content. In this post I am going to expand on that work and customise the content creation form itself. Testing showed that there are too many fields on the default form and that this was confusing to users.
Don't Touch It
When I train users on Joomla I usually tell them that if Brian didn't say to touch something then they shouldn't.
That's pretty much the only thing I can do in the Joomla admin as otherwise you would need to override everything. But with front end content creation it's much simpler to customise the user experience.
Overriding the form
Sander Potjer wrote a great article in the Joomla Magazine with a step by step process for creating your own Joomla content creation form. You can read it there and this is exactly what I started with. I won't waste any time reproducing it here - just read it for yourself.
Article Images
On the site I built I am using exactly the same image for the blog and the article image. This has the advantage of only asking the content creator to upload a single image. Trying to convince someone to do the exact same thing twice (for each field) is just never going to make sense.
As you can see from the screenshot below I only have one field for the image AND I added a note informing the user the exact content dimensions required.
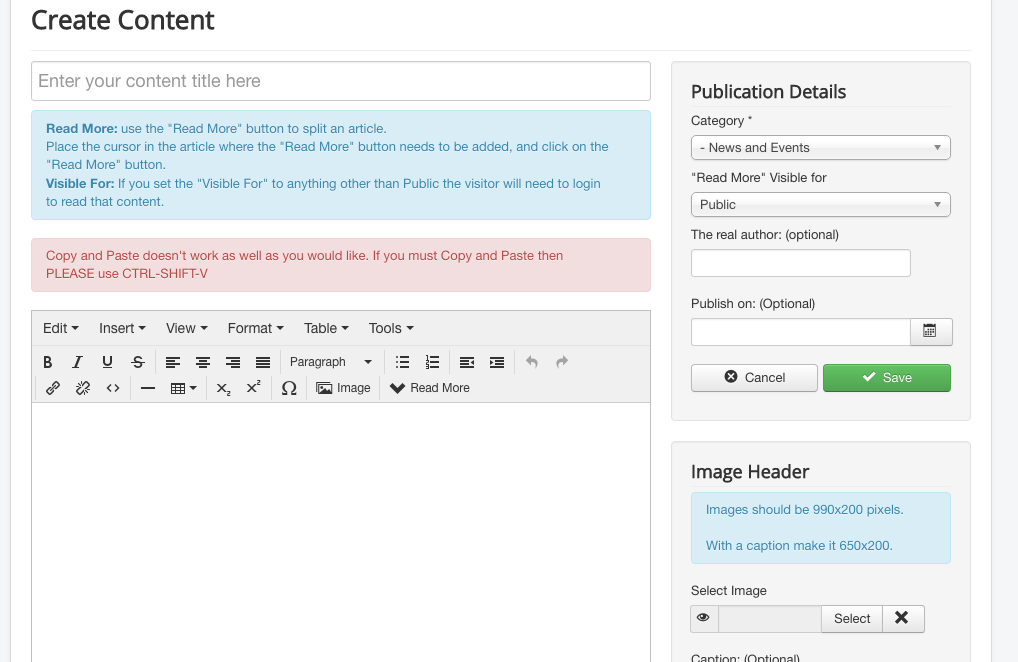
In some parts of the site an article will be displayed in both a blog and full article view and in other parts it will just be a full article. So chosing a single image dimension that worked for both was a little tricky but in the end I settled on 990 x 200 pixels as that worked best in my template.
Content Override
The problem with using the same image from one field in two places was that whichever I chose, intro or full image I would need to create an override somewhere. I chose to use the intro image field and then create an overide of the article view to use the same image.
Creating the Override Part 1
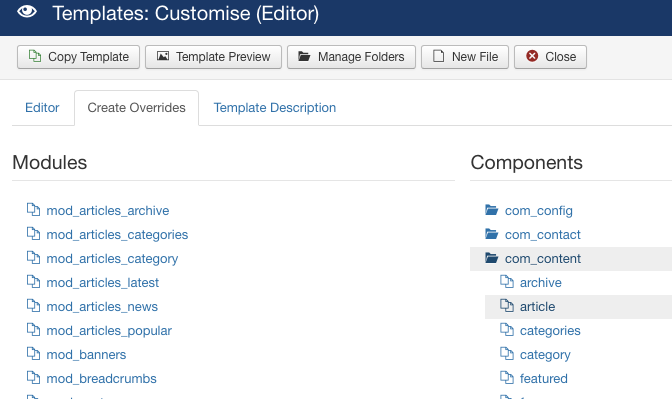
If you've never created an override before it's quite easy to do and nothing you should be scared of. Go to Extensions->templates->templates and select the editor template we created in the first blog post. When you've done that select the overrides tab and click on com_content and then article to create the override.
Creating the Override Part 2
Now you have created the override go back to the frst tab and then navigate to the file as shown in the screenshot below.

Scroll down to line 96 and delete lines 96 through to 103. You can then replace them with

NOTE In Joomla 3.7 its even easier as I contributed simplified code for that file so now you will only need to edit line 101 which looks like this

and change it as above.
Don't worry about that change in 3.7 - if you make the change in your override now then it will still work in 3.7 and beyond.
Customising the Editor
It will be no suprise to you that I like to use the core of Joomla as much as possible. It makes life so much easier when it comes to upgrades. One area where I always used to use a third party extension was the default editor which I replaced with JCE. The number one reason for this was so that I could create a custom toolbar for the editor with only the buttons I wanted the client to use. (I really don't want them adding font colours and font backgrounds).
The problem with the core TinyMCE editor was that while it had a simple mode if I wanted to use that then I would have to use that everywhere and only JCE offered me the custom experience I was looking for. But that all changes in Joomla 3.7 where you have the ability to completely customise the toolbar for every usergroup. So in this site I didn't bother to install JCE and I will just wait for the relase of 3.7 to customise the editor. One less extension to install, update and support - big win for me and the site owner.
Finishing Off
So now we have a simpler edit form thanks to Sanders code and this small change to use the same article image. The client also wanted to add drag and drop images to the content item itself.
Adding Drag and Drop image support
I bet you thought this was going to be hard. Well it's not and will take you exactly ZERO seconds to implement as Joomla has supported this for quite a long time now. Dont believe me - and a lot of people don't - then check out this video.
So now we have a simplified content creation and editing form in a distraction free template to make life easier for our authors.

 Congratulations, you discovered a hidden secret!